Thursday, October 7, 2010

Lavender Cream/Citrus Cream Cheese Minis

A wonderfully light summertime treat - these are a perfect contribution to potlucks, barbecues, and the like.  I used this recipe.

I have only made these as mini-cupcakes, and I suspect they work best that way.  The cream-to-cake ratio is perfect, and their cloudlike texture is complemented well by their delicate size.  

The base is a plain vanilla cupcake, a nice frame for the other flavors.  

The filling is a delicious, light, lavender-infused cream.  Tiny dried lavender flowers are heated in a simple syrup of sugar and water until their sweet perfume fragrances the air.  Then the flowers are strained and discarded, and the flavored syrup is drizzled slowly into freshly whipped cream.  When people hear that these are lavender cream cupcakes, they tend to make the easy assumption that the lavender cream is the purple stuff on top...alas, the airy lavender cream is actually white in color, with a dollop tucked within each little cake.  This is one cupcake in which I save the caps of the middles to cover the filling.  With a heavier filling, I feel confident that the frosting and the filling will stay separate as they should, but with a filling as light as this one, it seems that it would just float away without a cake cap to hold it down.  I still recommend eating the rest of the middles though.

Topping these confections is citrus cream cheese, tinted lavender, which is confusing but pretty.  The citrus flavor can come from any combination of orange, lemon, and lime juice and zest.  I use all three fruits when I make these cupcakes.  Sprinkled over the frosting of my cupcakes is additional citrus zest - the bright orange, yellow, and green look striking on a pale purple background.  In the original recipe, she recommends sprinkling additional dried lavender flowers over the cakes.  I prefer the brighter colors and subtle effect of the zested fruit, and feel that citrus zest is more familiar and likely to be eaten than shriveled lavender flowers.  Fresh lavender flowers, on the other hand, would be just lovely.  Perhaps next time!

Wednesday, May 19, 2010

Strawberry/Chocolate Cupcakes


Strawberries and chocolate - is there any better combination?  These little confections begin as a basic chocolate cupcake.  I used the very simple and straighforward Creative Loafing recipe.  After the little cakes had cooled, I used the wide end of a pastry tip and a small spoon to remove the core of each cupcake.  While leafing through the Martha Stewart's cupcake book at a bookstore last weekend, I noticed that she recommends discarding cupcake middles after removing them!  I usually just eat them - the middles are soft and delicious, a sweet reward for making complicated cupcakes.

The second step involved combining semisweet chocolate (I use Ghiradelli, yum!), warm cream, and butter to create a smooth chocolate ganache.  The ganache is poured into the middle of each cupcake and allowed to cool and thicken slightly.  I usually save little cake caps from the middles to place over the filling, but they work just as well without covers - the frosting hides the filling anyway.

For frosting, I decided to make strawberry Swiss meringue buttercream.  Swiss meringue buttercream is made using egg whites, sugar, and butter. (I halved the recipe in the above link.) The egg whites and sugar are combined over heat in a bain-marie until smooth.  Every recipe I have seen for Swiss meringue buttercream says to test the egg/sugar mixture between your fingers for homogeneity - no matter how clean your fingers, be careful not to get them in the mixture at any time between separating the eggs and the incorporation of the butter.  Any oil that may be on your fingers will make it more difficult to whisk the mixture to stiff peaks after heating.  Along these lines, any egg yolk that gets in with the whites will also prevent the mixture from getting satisfactorily fluffy.  Though it makes for more dishes to wash, I use two extra bowls when separating eggs.  I crack one egg at a time and pour the white into one small bowl and the yolk into the other.  If the yolk is intact, I transfer the egg white to its final destination.  The next egg is cracked in the same way, into the small egg white bowl first, then whites transferred if they have separated well.  If any yolk gets into the small egg white bowl, I can discard just that egg without losing the rest of the eggs in the recipe.  The yolks and any contaminated whites can be saved for another purpose.  After the sugar and egg whites are combined, tested by being dripped into a plate and rubbed between your fingers, and removed from heat, they should be whisked to stiff peaks.  Every single time I do this I get scared that the peaks will not form - it takes a while - and just when it appears completely hopeless they finally get frothy!  The butter makes the mixture beautiful and shiny.  To get the strawberry flavor I was seeking, I pureed nearly a pint of hulled strawberries in the food processor, then folded it into the buttercream a little at a time.  If you go slowly enough, the buttercream will let you know when it has had enough - too much puree would threaten the stability of the mixture.  I do not strain the strawberry puree before incorporating it into the frosting because I like the natural look provided by the little seeds and tiny strawberry bits.  This is the one frosting I simply cannot resist eating right out of the bowl - it is very light and fluffy and not too sweet, with a strong strawberry flavor.  I used a #21 tip to pipe the frosting on in three layers for extra height. 

I had reserved some strawberries for decoration, so I cut them up and pressed a piece into the top of each cupcake.  I considered soaking them in syrup to make them shinier while I crafted the cupcakes, but again I think I prefer the natural look.

Finally, I thinned the remaining chocolate ganache with a small amount of corn syrup and drizzled it over each cupcake using a #4 tip.

My favorite part?  The adorable cupcake boxes I found at Michael's.  I made this batch of cupcakes to use as thank-you gifts, and the little boxes for four worked perfectly!


Monday, March 29, 2010

Flashback: My First Cake


Two years ago I began my foray into cake-decorating.  It all started when a group of my classmates planned a baby shower for one of our own who was expecting a baby girl.  I volunteered to bring a dessert - by this point I was proficient at homemade brownies, and thought that graduating to baking a real cake would be...a piece of cake.  I searched online for ideas and was captured by the look of a classic - the baby blocks cake.  The next thing I needed to to do was find an appropriate recipe.  When I stumbled across the almond pound cake recipe, I knew it was the one.

The recipe claims to serve 24 with three blocks, so I doubled the recipe just in case.  Since this really was my first baking experiment of this kind, I acquired at that time some of the tools I now use quite often - a hand mixer, silicone cake pans, and a set of sturdy mixing bowls.  I was very hesitant to even buy a mixer, thinking that I would never use it again, and now am so glad that I did.  Little did I know at the time that this would turn into a preferred pastime for me!

The construction of the baby blocks cake is similar to the aforementioned bridal shower cake.  Each batch of batter fills two 8x8 cake pans.  After baking and cooling, each of those layers is torted, then bisected vertically and horizontally to yield a total of sixteen thin 4x4 inch squares of cake.  The squares are stacked, five per block, with raspberry jam between the layers.  After overnight refrigeration, a layer of whipped cream frosting is applied to the sides and top of each block, and they are stacked and decorated as desired.

Since this was before I had learned anything about cake decorating, I used liquid food coloring to tint my frosting, which thinned it and made the concoction slightly difficult to work with.  Without the appropriate tools, I spread my frosting on with rubber spatulas and smoothed it with a table knife.  I stuffed some reserved white frosting in a ziploc bag with a #5 tip from a small decorating set I had found at Target, and piped on the decorations with a shaking hand.  The baby's name fit well across the front of the cake, thanks to my preliminary planning sketches which directed block placement.  On the top of the cake was a congratulatory message to the new parents in script.

The baby shower was planned to be at the house of a school employee who was good friends with the new mother.  Unfortunately, that very morning, the hostess' son had a health emergency and she was unable to be home for the party.  I had been wondering how I would transport this large, heavy, and somewhat fragile cake creation anyway, so my roommate and I offered to host the party at our place instead.  My cake survived its short journey from the kitchen to the dining room table, and all was well.  The guests were impressed by the three dimensional effect, and the cake was pronounced delicious by all in attendance!  This is a fun cake to make for a baby shower, and I look forward to attempting it again if the occasion arises.

I feel that I've come a long way as a baker since my first cake, and hope to improve even more with additional practice!

Sunday, March 14, 2010

Bridal Shower cake


My beautiful friend Melissa is getting married soon, and some of the ladies at our church recently threw her a surprise bridal shower!  I volunteered to bake a cake to mark the occasion and, as soon as I started searching online for cake ideas, realized that I was perhaps in over my head.  The bridal shower would be the largest party for which I had baked, and the cakes I saw online were gorgeous!  I knew I had a lot of work to do.

My first thought when planning the cake was that it should be white in color, in keeping with the theme of the evening.  Instead of going with basic white sheet cake, I decided to resurrect a recipe I had used once before for a baby shower - almond pound cake!  The recipe is intended for an 8x8 inch pan, so I whipped out my calculator and determined that doubling the recipe in a 9x13 inch pan would give me a thickness close enough to what the original recipe intended.  In addition, the 8x8 inch cakes are intended to be split into two layers, and I hoped to divide mine into three.

I ground the almonds, assembled the batter, added stick after stick of butter, and poured in delicious, sweet, pure almond extract.  The bottom of the baking pan was prepared with one of my favorite kitchen helpers - parchment paper.  Parchment paper releases cookies and cakes deftly.  A carefully-cut layer at the bottom of a cake pan can be the difference between a cake that pops easily out of its pan and a cake that crumbles as it is cajoled and scraped out by its desperate baker.  I've learned from experience that parchment paper can be a baker's best friend.  Because I had doubled the recipe, I adjusted the baking time and pulled the cake out of the oven when the edges were golden brown and threatening to darken further.

After the cake had cooled somewhat, I used my handy little cake leveler to split the large cake into three even layers.  Almond pound cake is fairly sweet, so I used a seedless raspberry jam between the layers to add some balance to the flavor.  It is good to chill this type of cake before decorating, so the layers learn to stick together and don't slide around.  Mine spent the night in the refrigerator.

The next day, I prepared a large amount of the whipped cream frosting as directed by the recipe for this cake.  This consisted exclusively of heavy cream, sugar, vanilla extract, and a small amount of plain gelatin for stability.  I tinted the whole bowl of frosting pink to be used as a base layer and slathered it on as smoothly as I could on the top of the cake.  For the sides, I used the same frosting, but used my spatula to attempt a textured look.

For the decoration, I mixed up a batch of  vanilla buttercream.  Since I have only taken Wilton Level One, my repertoire is limited to clowns, animal faces, and basic flowers.  After ruling out clowns and animal faces as decorating possibilities, I quickly realized I was too out-of-practice on the Wilton Rose to include that as well!  Luckily the written message took up most of the cake surface.  I began with white frosting and a small round decorating tip to write the words.  Next I tinted a small amount of frosting dark pink and some more bright green.  I knew my words were not quite straight, so at a friend's suggestion I used the flowers to create the optical illusion of alignment - small flowers in the upper right corner and large ones in the lower left.  Leaves in green frosting sprouted from between and around the flower petals for added color.  I have some difficulty leaving well enough alone, so I next decided that the white wording did not provide enough contrast with the pale pink whipped cream.  I used the remaining darker pink buttercream to outline the words I had drawn, which ended up having a nice effect.  I added a shell border at the top of the cake, and a star border at the bottom.  I drove very carefully to the location of the bridal shower to avoid destroying my handiwork, and heaved a sigh of relief upon seeing that the main source of illumination in the food area was candlelight.  The dim lighting hid my decorating errors nicely, and the ladies really seemed to enjoy the cake.

This recipe is one of my favorites!  It is a thick, heavy, sweet cake offset by smooth, tart jam and light, airy whipped cream frosting.  (I will include a link to the recipe in my next post!)  Though I do not regret choosing it for this bridal shower cake, I do think that this pound cake does much better in a smaller pan, such as the 8x8 inch type suggested by the original recipe.  Does anyone know of a way other than these to line up one's message straighter on a cake?

Thursday, March 4, 2010

Strawberries and Cream Cheesecake


This confection was assembled for the birthday celebration of a friend of mine.  His wife requested a low-carb cake for his birthday party, so I decided to go with a cheesecake.  I love baking cheesecakes, but since the man of the hour is a bit of a food connoisseur, I knew I had to take the flavor of my cake to a new level.

Since strawberries were in season (and on sale) at the time, I based my cake around that fruit using a Martha Stewart recipe for inspiration.  This cake is essentially three layers - a graham cracker crust, a layer of strawberry cheesecake (2/3), and a thin layer of vanilla cheesecake (1/3) on top.

Before the first step of the cake itself, I baked a tray of strawberries drizzled with corn syrup.  The berries turned a deep red color, and the smell was heavenly!  Mmm, baked strawberries.  Next, I mashed them up to be added to the cheesecake batter later.  They were crushed very easily as they had softened during their time in the oven.

Though the graham cracker crust should have been the easiest step, it turned into a learning experience for me.  I happened to have some whipped butter in my fridge, and thought that using this product would save me time in melting it as called for in the recipe.  What I did not consider is that a tablespoon of whipped butter contains less butter (and more air) than a tablespoon of butter in stick form.  So I measured out the number of tablespoons of butter called for by the recipe, and baked the crust.  This misstep wasn't nearly as dramatic as the one detailed in my last post, but the crust did end up being a little crumblier than I would have liked.  (In fact you can see some crust crumbs on the plate in my photo!)  The correct amount of butter would have held the graham cracker crumbs more tightly together.  The taste was not affected, as far as I could tell.

The next step was to mix up the cheesecake batter.  This was done in the usual way, except for the addition of two very special ingredients.  The first was a cup of mascarpone cheese, which is a delicious, sweet Italian triple-cream cheese.  Most of the cheese in the recipe was regular American cream cheese, but replacing a quarter of it with mascarpone made for a much smoother, more distinctive-tasting cheesecake without giving up the stability provided by the denser conventional cream cheese.  The second ingredient which delighted me was the seeds of a freshly scraped vanilla bean.  I am used to using vanilla extract, and have learned from experience when to use the expensive organic kind and when I can get away with the regular grocery store stuff, but a freshly scraped vanilla bean took the flavor to a whole new level!  At about five dollars per bean, this isn't something I would use for just any recipe, but I think it added a lot to this cake.  I can still remember the sweetness of the vanilla fragrance that lingered for hours after that tough, dry-looking pod yielded its precious, delicious seeds.  The bottle I bought contained two beans, and the one left in my pantry is calling me to make this cake again!  Any birthday parties coming up?

After blending the cheesecake batter, five cups were removed to be mixed with the mashed strawberries prepared earlier.  The strawberry and batter mixture was poured into the crust first, followed carefully by the remainder of the vanilla cheesecake batter to avoid disturbing the layered effect.

I baked the cake according to the recipe, using a water bath under my springform pan to provide even heating and prevent cracks in the top of the cake.  After it had cooled and rested in the refrigerator overnight, I decided it was missing something - a topping!  I blended some leftover strawberries with the juice of half a lemon, then strained the mixture to remove the strawberry seeds and make a tart, tasty coulis.  The slightly sour coulis complemented the sweet cheesecake very well. 

Though my photo does not show it, the layers of this cake provide an impressive visual effect, and the taste is perfect for strawberry season!

Friday, February 26, 2010

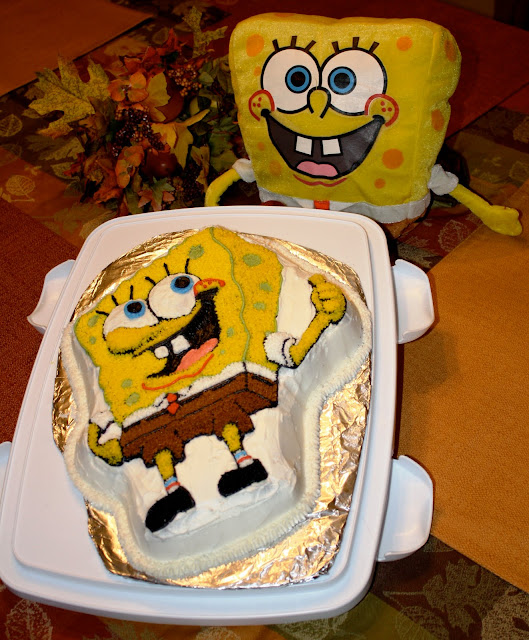
Spongebob Squarepants


Michael's, a national chain of craft stores, carries some great character cake pans. Above is a Spongebob cake I made for Thanksgiving - chocolate cake with buttercream icing. Since this was my first time making a character cake, I used the Wilton recipe for buttercream for the white areas of the cake, but soon felt comfortable enough to use my own buttercream recipe to pipe the colored areas. Though the Wilton recipe provides the greatest stability and ease of decoration, it contains shortening and artificial flavors which I would rather not feed my friends. My own buttercream is a simple mix of unsalted butter, powdered sugar, and natural vanilla. I was a little nervous about using butter rather than shortening because the cake needed to survive 12 hours in the car without refrigeration - this is not a food safety issue, but melted frosting was a real possibility. Fortunately, the cake arrived at its destination intact and looking just as it had when I had completed the decoration.

As you can see, I cut a custom backboard for the cake. To do this, I traced the character pan on a cake board before filling it with batter, then cut out the shape and covered it with foil. The reason it does not match up well with the contours of the cake is because I covered the wrong side with foil so the board is backward. Oops!

Another mistake to watch out for when making a character cake is overfilling the cake pan. Every character pan comes with specific directions, including how much batter should be poured into the pan before baking. Multitasking as I baked my cake, I did notice that the character pan called for one box of cake mix. I prefer to use my own recipe for cake batter to better utilize pure and whole ingredients, so I thought I would just make one regular batch of batter. After doing so and pouring it in the character pan, I noticed that the level of batter seemed a little low, so I mixed up another batch of chocolate cake batter and poured that in as well. I don't know what I was thinking, but I kept pouring until the character pan was full to the brim with batter, then placed it in the oven on a cookie sheet. Thank goodness for that cookie sheet because I think you can guess what happened next. As the batter began to bake, it overflowed the sides of the pan and filled the cookie sheet because I had in fact used twice as much batter as necessary. The cake-splosion was a little messy, but delicious, to clean up, and my second try turned out much better as seen above. I have learned my lesson - one batch of batter per character pan unless otherwise specified!