Showing posts with label cake. Show all posts

Sunday, July 1, 2012

Elmo

When I heard that my best friend would be visiting me from out-of-state during her son's birthday, I knew it was time to acquire my second character cake pan - an Elmo face!  Wilton makes two Elmo pans, this one and full Elmo holding birthday accessories.  Sadly, the second one is out of print and can only be found used.  However, the cake above was a beautifully simple one to decorate. 

The inside is funfetti - just add rainbow sprinkles to your favorite vanilla cake recipe before baking!  For the frosting, I used a shortening/butter combination to make an American buttercream.  American buttercream is packed with sugar and tends to be a bit too sweet for my taste, but it holds color and shape well on a cake, and it is a favorite of children.  I liked how the #18 star piping made his face look furry, just like in real life.

Our greatest difficulty was deciding where to place the candle.  There is really no logical location on Elmo's face, so we just stuck it on his cheek in the end.  The baby loved the cake and made many attempts to hug Elmo when we sat him near the cake to take a few photos.

Monday, March 29, 2010

Flashback: My First Cake


Two years ago I began my foray into cake-decorating.  It all started when a group of my classmates planned a baby shower for one of our own who was expecting a baby girl.  I volunteered to bring a dessert - by this point I was proficient at homemade brownies, and thought that graduating to baking a real cake would be...a piece of cake.  I searched online for ideas and was captured by the look of a classic - the baby blocks cake.  The next thing I needed to to do was find an appropriate recipe.  When I stumbled across the almond pound cake recipe, I knew it was the one.

The recipe claims to serve 24 with three blocks, so I doubled the recipe just in case.  Since this really was my first baking experiment of this kind, I acquired at that time some of the tools I now use quite often - a hand mixer, silicone cake pans, and a set of sturdy mixing bowls.  I was very hesitant to even buy a mixer, thinking that I would never use it again, and now am so glad that I did.  Little did I know at the time that this would turn into a preferred pastime for me!

The construction of the baby blocks cake is similar to the aforementioned bridal shower cake.  Each batch of batter fills two 8x8 cake pans.  After baking and cooling, each of those layers is torted, then bisected vertically and horizontally to yield a total of sixteen thin 4x4 inch squares of cake.  The squares are stacked, five per block, with raspberry jam between the layers.  After overnight refrigeration, a layer of whipped cream frosting is applied to the sides and top of each block, and they are stacked and decorated as desired.

Since this was before I had learned anything about cake decorating, I used liquid food coloring to tint my frosting, which thinned it and made the concoction slightly difficult to work with.  Without the appropriate tools, I spread my frosting on with rubber spatulas and smoothed it with a table knife.  I stuffed some reserved white frosting in a ziploc bag with a #5 tip from a small decorating set I had found at Target, and piped on the decorations with a shaking hand.  The baby's name fit well across the front of the cake, thanks to my preliminary planning sketches which directed block placement.  On the top of the cake was a congratulatory message to the new parents in script.

The baby shower was planned to be at the house of a school employee who was good friends with the new mother.  Unfortunately, that very morning, the hostess' son had a health emergency and she was unable to be home for the party.  I had been wondering how I would transport this large, heavy, and somewhat fragile cake creation anyway, so my roommate and I offered to host the party at our place instead.  My cake survived its short journey from the kitchen to the dining room table, and all was well.  The guests were impressed by the three dimensional effect, and the cake was pronounced delicious by all in attendance!  This is a fun cake to make for a baby shower, and I look forward to attempting it again if the occasion arises.

I feel that I've come a long way as a baker since my first cake, and hope to improve even more with additional practice!

Sunday, March 14, 2010

Bridal Shower cake


My beautiful friend Melissa is getting married soon, and some of the ladies at our church recently threw her a surprise bridal shower!  I volunteered to bake a cake to mark the occasion and, as soon as I started searching online for cake ideas, realized that I was perhaps in over my head.  The bridal shower would be the largest party for which I had baked, and the cakes I saw online were gorgeous!  I knew I had a lot of work to do.

My first thought when planning the cake was that it should be white in color, in keeping with the theme of the evening.  Instead of going with basic white sheet cake, I decided to resurrect a recipe I had used once before for a baby shower - almond pound cake!  The recipe is intended for an 8x8 inch pan, so I whipped out my calculator and determined that doubling the recipe in a 9x13 inch pan would give me a thickness close enough to what the original recipe intended.  In addition, the 8x8 inch cakes are intended to be split into two layers, and I hoped to divide mine into three.

I ground the almonds, assembled the batter, added stick after stick of butter, and poured in delicious, sweet, pure almond extract.  The bottom of the baking pan was prepared with one of my favorite kitchen helpers - parchment paper.  Parchment paper releases cookies and cakes deftly.  A carefully-cut layer at the bottom of a cake pan can be the difference between a cake that pops easily out of its pan and a cake that crumbles as it is cajoled and scraped out by its desperate baker.  I've learned from experience that parchment paper can be a baker's best friend.  Because I had doubled the recipe, I adjusted the baking time and pulled the cake out of the oven when the edges were golden brown and threatening to darken further.

After the cake had cooled somewhat, I used my handy little cake leveler to split the large cake into three even layers.  Almond pound cake is fairly sweet, so I used a seedless raspberry jam between the layers to add some balance to the flavor.  It is good to chill this type of cake before decorating, so the layers learn to stick together and don't slide around.  Mine spent the night in the refrigerator.

The next day, I prepared a large amount of the whipped cream frosting as directed by the recipe for this cake.  This consisted exclusively of heavy cream, sugar, vanilla extract, and a small amount of plain gelatin for stability.  I tinted the whole bowl of frosting pink to be used as a base layer and slathered it on as smoothly as I could on the top of the cake.  For the sides, I used the same frosting, but used my spatula to attempt a textured look.

For the decoration, I mixed up a batch of  vanilla buttercream.  Since I have only taken Wilton Level One, my repertoire is limited to clowns, animal faces, and basic flowers.  After ruling out clowns and animal faces as decorating possibilities, I quickly realized I was too out-of-practice on the Wilton Rose to include that as well!  Luckily the written message took up most of the cake surface.  I began with white frosting and a small round decorating tip to write the words.  Next I tinted a small amount of frosting dark pink and some more bright green.  I knew my words were not quite straight, so at a friend's suggestion I used the flowers to create the optical illusion of alignment - small flowers in the upper right corner and large ones in the lower left.  Leaves in green frosting sprouted from between and around the flower petals for added color.  I have some difficulty leaving well enough alone, so I next decided that the white wording did not provide enough contrast with the pale pink whipped cream.  I used the remaining darker pink buttercream to outline the words I had drawn, which ended up having a nice effect.  I added a shell border at the top of the cake, and a star border at the bottom.  I drove very carefully to the location of the bridal shower to avoid destroying my handiwork, and heaved a sigh of relief upon seeing that the main source of illumination in the food area was candlelight.  The dim lighting hid my decorating errors nicely, and the ladies really seemed to enjoy the cake.

This recipe is one of my favorites!  It is a thick, heavy, sweet cake offset by smooth, tart jam and light, airy whipped cream frosting.  (I will include a link to the recipe in my next post!)  Though I do not regret choosing it for this bridal shower cake, I do think that this pound cake does much better in a smaller pan, such as the 8x8 inch type suggested by the original recipe.  Does anyone know of a way other than these to line up one's message straighter on a cake?

Friday, February 26, 2010

Spongebob Squarepants


Michael's, a national chain of craft stores, carries some great character cake pans. Above is a Spongebob cake I made for Thanksgiving - chocolate cake with buttercream icing. Since this was my first time making a character cake, I used the Wilton recipe for buttercream for the white areas of the cake, but soon felt comfortable enough to use my own buttercream recipe to pipe the colored areas. Though the Wilton recipe provides the greatest stability and ease of decoration, it contains shortening and artificial flavors which I would rather not feed my friends. My own buttercream is a simple mix of unsalted butter, powdered sugar, and natural vanilla. I was a little nervous about using butter rather than shortening because the cake needed to survive 12 hours in the car without refrigeration - this is not a food safety issue, but melted frosting was a real possibility. Fortunately, the cake arrived at its destination intact and looking just as it had when I had completed the decoration.

As you can see, I cut a custom backboard for the cake. To do this, I traced the character pan on a cake board before filling it with batter, then cut out the shape and covered it with foil. The reason it does not match up well with the contours of the cake is because I covered the wrong side with foil so the board is backward. Oops!

Another mistake to watch out for when making a character cake is overfilling the cake pan. Every character pan comes with specific directions, including how much batter should be poured into the pan before baking. Multitasking as I baked my cake, I did notice that the character pan called for one box of cake mix. I prefer to use my own recipe for cake batter to better utilize pure and whole ingredients, so I thought I would just make one regular batch of batter. After doing so and pouring it in the character pan, I noticed that the level of batter seemed a little low, so I mixed up another batch of chocolate cake batter and poured that in as well. I don't know what I was thinking, but I kept pouring until the character pan was full to the brim with batter, then placed it in the oven on a cookie sheet. Thank goodness for that cookie sheet because I think you can guess what happened next. As the batter began to bake, it overflowed the sides of the pan and filled the cookie sheet because I had in fact used twice as much batter as necessary. The cake-splosion was a little messy, but delicious, to clean up, and my second try turned out much better as seen above. I have learned my lesson - one batch of batter per character pan unless otherwise specified!

Saturday, October 17, 2009

Fall Carrot Cake


This is a cake I created in the fall, and decorated with a friend to celebrate an occasion with some members of the FSSP and their supporters. It was a carrot cake made from scratch, covered with cream cheese frosting, and turned out to be the perfect taste for autumn. I had never made carrot cake before, so I turned to my go-to website for new recipes, marthastewart.com! The recipe I found was right up my alley, requiring the baker to toast her own pecans and grate fresh ginger to add to the cake batter. Speaking of grating, the most time-(and bicep-)consuming step in this recipe was the peeling and grating of all those fresh carrots.

The frosting on this cake is the delicious cream cheese recipe that accompanies the recipe linked above. The secret ingredient in this frosting is freshly grated orange zest! It also contains freshly grated ginger. The combination of those two flavors creates a frosting unlike any other used to top a carrot cake. Though the recipe only calls for a small amount of each of these flavorful ingredients, the recipients of my cake noticed and commented on the unusual and delicious taste!

The decorations were added months before my cake-decorating friends and I took our first Wilton class. I have since learned the proper way to make leaves and other patterns, but I think the FSSP symbol at least is already quite recognizable in the center of the cake.

Saturday, September 12, 2009

Flag Cake!


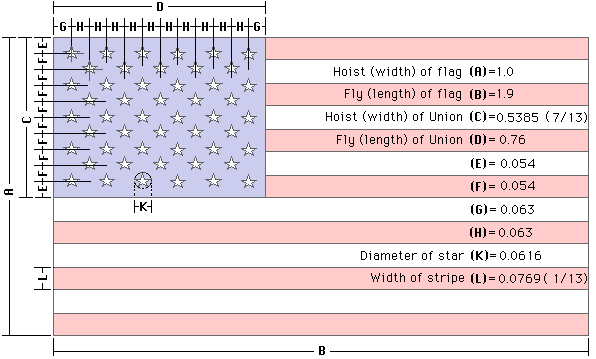
This is a cake I crafted for the Fourth of July this year. It consisted of two giant (11inx17in) slabs of white cake (egg whites only for the brightest white!), with vanilla whipped cream frosting and strawberry slices between the layers. On top is the same frosting, with raspberries, blueberries, and piped frosting for decoration. For authenticity of my dimensions, I employed the use of this:

as well as a ruler and a toothpick. Toothpicks are ideal for drawing guidelines in your base layer of frosting before going over them with your decorating materials. The faint lines are completely covered by your decorations, and the rows of berries end up much straighter than they might have been if thrown on freehand!

The cake layers were baked and assembled the evening before the occasion, and frosted the following day. I waited to place the berries until the morning to prevent them from staining the white frosting with their juice, as berries are wont to do. I used a different style of piping for each of the white stripes, mostly for additional practice on my part, which turned out to have a nice effect. I wish I had a better photo to share, but we were just able to snap this one before grabbing the (very heavy) cake and rushing out the door! It is a crowd-pleaser for sure, and will definitely be made again - maybe next year there will be time for a more dignified photo of this delicious and simple cake.